Adding additional storage to a node in Aria Operations

Hi, Today I had a problem, my vRops UI not working and showed me a text: Redirect vRops UI

This is caused when vRops db does not have sufficient space. I show you how you can solve this error.

I SSH to my vRops.

df -h

Note: You can’t extend the current /storage/db logical volume in vRops, and must add a new hard to each vRops analytic node.

Resolution

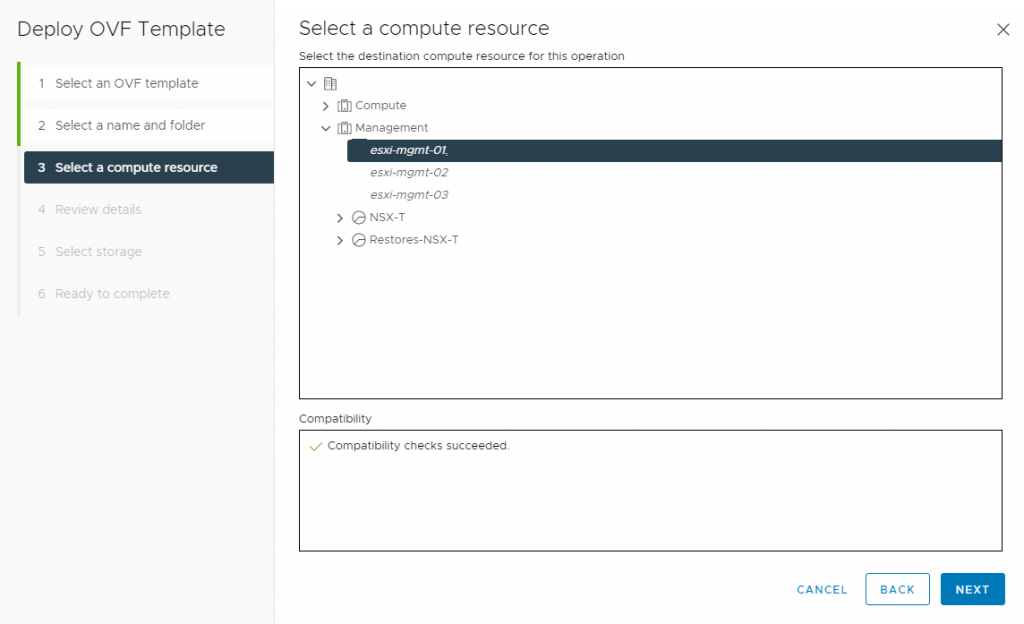
Ensure the vRealize Operations cluster is Offline, then log into the VMware vSphere client as an administrator.

  1. Right-click the desired vRealize Operations node and click Power > Shut Down Guest OS.
  2. Right-click the powered-off node and click Edit Settings.
  3. Click the Hardware tab and click Add.

Note: Do NOT expand an existing disk.

  1. Click Hard Disk and click Next.
  2. Select Create a new virtual Disk and click Next.
  3. Set the Disk Size to an appropriate value.
  4. Select a disk provisioning format, if applicable.
    • Note: When possible, select the Thick Provision Eager Zeroed option.
  5. Select a location to store the disk and click Next.
  6. Accept the default Virtual Device Node and click Next.
  7. Review the information and click Finish.
  8. Click OK. The new storage is now added to the node.
  9. Right-click the node and click Power On.
  10. Repeats steps 1-13 on all other analytic nodes.
    • Note: All analytic nodes must have the same amount of space in the /storage/db logical volume.
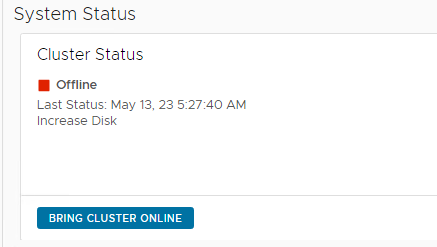
  11. Log into the Admin UI as admin and click the Bring Online button to bring the cluster online.
  12. The node discovers the additional storage and adds it to the /storage/db logical volume automatically during boot.
  13. I SSH to my vRops and type df -h

Finish 🙂

You can see my other post about vRops from below links:

vRealize Operation

How to change a node hostname in vRealize Operations Manager 8.6

Hi, Today I installed a new vRops version 8.6, and I realized, that it’s name is photon-machine.

Before I start my cluster, I want to change it.

How?

1- First, SSH to vRops server or appliance address and login as a root user.

2- write this command

$VMWARE_PYTHON_BIN /usr/lib/vmware-vcopssuite/utilities/bin/sethostname.py <NewHostName>

For example:

My old name is photon-machine and I want to change it to vrops01.

$VMWARE_PYTHON_BIN /usr/lib/vmware-vcopssuite/utilities/bin/sethostname.py vrops01

3- After that, Type reboot, then press Enter to reset your server.

4- Use the vRops admin UI to bring the cluster online.

Reference:

https://kb.vmware.com/s/article/2108689

Finish 🙂

How to unlock root account in vRealize Operations 8.X

Hi, In this post I showed you, how you can reset the root password. Now, I would like to show you, how you can unlock the root account in vRealize Operation 8.x.

  1. Log into the vRealize Operations admin UI as the local admin user. 
  2. Select the desired node and click Take Node Offline/Online.

Note: If using a single node cluster, click Take Offline under Cluster Status.

  1. In the vSphere Client, open the console of the desired node.
  2. With the console open, restart or power on the virtual machine.
  3. Type the letter e to go to the GNU GRUB edit menu.
  4. When the GRUB loader menu appears, immediately use the up and down arrow keys to navigate to the end of the line that starts with Photon OS or linux for new 8.x deployments.
  1. Add a space, then type rw init=/bin/bash which adds another option to the line.

8. Press F10.

Note: The virtual appliance starts in single-user mode.

9. To unlock the root account, open /etc/pam.d/system-auth in a text editor.

Comment out the following line by adding a # in front of it:

auth    required    pam_tally2.so onerr=fail deny=3 unlock_time=900 root_unlock_time=900 file=/var/log/tallylog

Example:

 #auth    required    pam_tally2.so onerr=fail deny=3 unlock_time=900 root_unlock_time=900 file=/var/log/tallylog
  • 10. Save and close the file.
  • 11. Type sync and press Enter to flush the data to disk.
  • 12. Type umount / and press Enter.
  • 13. Type reboot -f and press Enter.

Note: If the reboot command fails, restart the Virtual Machine through vSphere.

  • 14. In the vSphere Client, reopen the console of the desired node and login using root.
  • 15. Run the following command:
pam_tally2 -u root --reset

Note: This command may need to be run twice.

  1. Open /etc/pam.d/system-auth in a text editor.
  2. Uncomment the line from step 10 by removing the # in front of it.

Example

auth    required    pam_tally2.so onerr=fail deny=3 unlock_time=900 root_unlock_time=900 file=/var/log/tallylog
  1. Save and close the file.
  2. Log into the vRealize Operations admin UI as the local admin user. 
  3. Select the desired node and click Take Node Offline/Online

Main Resource:

https://kb.vmware.com/s/article/2001476

Finish 🙂

Workaround instructions to address CVE-2021-44228 and CVE-2021-45046 in vRealize Operations 8.x (87076)

Hi, Today I used this workaround for solving my vRops 8.5. If you upgrade your vRops to 8.6.2, You don’t need to read this blog post.

To apply the workaround for CVE-2021-44228 and CVE-2021-45046 to vRealize Operations, perform the following steps:

For Analytic (Primary, Replica, Data), Remote Collector and Witness nodes:

  1. Log into the vRealize Operations Manager Admin UI as the local admin user.
  2. Click Take Offline under Cluster Status.

Note: Wait for Cluster Status to show as Offline.

  1. Copy the attached data-rc-witness-log4j-fix.sh and vrops-log4j-fix.sh files to the /tmp directory on all Analytic, Remote Collector and Witness nodes in the cluster using an SCP utility.
  2. Log into each Analytic, Remote Collector and Witness node as root via SSH or Console, pressing ALT+F1 in a Console to log in.
  3. Change to the /tmp directory on all nodes
cd /tmp
  1. Run the following command on all nodes to make the data-rc-witness-log4j-fix.sh script executable:
chmod +x data-rc-witness-log4j-fix.sh
  1. Run the following command on all nodes to make the vrops-log4j-fix.sh script executable:
chmod +x vrops-log4j-fix.sh
  1. Run te following command on all nodes to execute the data-rc-witness-log4j-fix.sh script:
./data-rc-witness-log4j-fix.sh


Note: Ensure there are no ERROR messages in the script output.

  1. Run the following command on all nodes to execute the vrops-log4j-fix.sh script:
./vrops-log4j-fix.sh


Note: Ensure there are no ERROR messages in the script output.

  1. Run the following command on all nodes to restart the CaSA service:
service vmware-casa restart
  1. Log into the vRealize Operations Manager Admin UI as the local admin user.
  2. Click Bring Online under Cluster Status.

Note: Wait for Cluster Status to show as Online.

Reference:

https://kb.vmware.com/s/article/87076

Finish 🙂

How to reset the root password in vRealize Operations 8.X

Hi, I have a vRops 8.5, and I would like to show you how we can reset the root password.

  1. Log into the vRealize Operations admin UI as the local admin user. 
  2. Select the desired node and click Take Node Offline/Online.

Note: If using a single node cluster, click Take Offline under Cluster Status.

  1. In the vSphere Client, open the console of the desired node.
  2. With the console open, restart or power on the virtual machine.
  3. Type the letter e to go to the GNU GRUB edit menu.
  4. When the GRUB loader menu appears, immediately use the up and down arrow keys to navigate to the end of the line that starts with Photon OS or linux for new 8.x deployments.
  1. Add a space, then type rw init=/bin/bash which adds another option to the line.

8. Press F10.

Note: The virtual appliance starts in single-user mode.

  1. Type passwd root and follow the prompts to create a new root password.

Note: If the above command fails, try running sudo passwd root instead.

10. reboot your server.

Main Resource:

https://kb.vmware.com/s/article/2001476

Finish 🙂

Installing Management Pack from Operations Manager

Hi, Today i decided to monitor my EMC Unity with vRops. I need to install Dell EMC ESA for vROps.

Dell EMC Enterprise Storage Analytics provides preconfigured, customizable dashboards so users can optimally manage their storage environment:

1. Topology

2. Metrics

3. Overview

4. Create-Your-Own-Dashboard

You can find and download it from VMware Marketplace .

I downloaded this file.

dellemcenterprisestorageanalytics_6-1626968738565.pak

1- Login to your vRops, then go to Administarion –> Solutions –> Repository, Press the ADD button

2- Click on Browse

3- Select pakcage file that you downloaded it before.

4- Select Check box and press on UPDOAD button

5- Next

6- Select check box License Agreement and NEXT

7- Install Successful

8- You can see it in your Repositry, you must enter your storage username and password.

9- Enter a name for your account name, Your storage IP address and credential, Select your storage models from Connection Type, I select my Unity storage

10- You can add/delete more storage account in Other Accounts section

11- You can see your install result in Dashboard –> Dell EMC

Finish 🙂

How Upgrade vRops 7.5 to 8.5-Part4

How upgrade your vRops to new version?

We want upgrade vRops 7.5 to 8.5. There are some software update best practice:

  1. Take a snapshot of your deployed vRealize Operations clusters or back them up before you begin the software update. See the release notes for details on how to snapshot correctly.
  2. Run the pre-upgrade assessment tool before the upgrade. This is imperative and will provide you with a list of impacted content caused by the removal of numerous metrics from the product. Ignoring this step may potentially lead to broken content.
  3. Remove your snapshots after the software update completes or you may experience performance degradation.

Ok, let start the upgarde.

1- Login to your vRops admin UI:

https://your-ip/admin

2- Take cluster into offline status

3- Then go to the System Status section

4- Press Install a software update button and select your update file. Update files format must be *.PAK .

5- Then press upload button

6- If you have get error that means you dont have enough space, you can check you server space

SSH to you vRops IP Address:

df -h

my /storage/log use is 97%

7- I truncate the logs with this command:

find /storage/log/ -mount -type f -mtime +1 -exec echo {} \; -exec truncate -cs 0 {} \; 2>&1 | tee /tmp/files_truncated.txt

8- My update file’s successfully Done.

9- Press Next, and I accept the termsof this agreement

10- The next page show Important update and release information, Next

11- And Finallay press the Install button

Thank you very much.

Config your vRops Collector-Part3

Hello, In this part Configure our new collector, we installed that in part2.

1- login to collector ip address. Then I choose Expand an existing installation.

2- Next

3- Enter node settings and cluster information.

Node Name : Enter a name

Node Type : Remote Collector

Master node IP address or FQDN:

Validate your configuration, if master node and collector node see each other, You see the certificat data.

Press Next

4- Enter the cluster administrator account username and password.

5-Press FINISH 🙂

7- If you want see your result, you must go to your vRops urls, Administrations Tab, Management, Collection Status, like this:

Install Step by Step vRops Collector-Part2

According part1, In first DataCenter we intstalled and configured vRops 8.5 in large mode, Now we are going to add a collector in second dataccenter. Each datacenter has own vCenter server.

1- Select an OVF template

2- Select a name and folder

3- Select a compute resource

4- Review details

5- Accept license agreements

6- According the our senario, I select Remote Collector deployment

7- Select storage

8- Select networks

9-  Customize template [ Your Gateway, Domain Name, Domain Search Path, Domain Name Servers, Network IP Address and Network Netmask]

10- Ready to complete 🙂

Install Step By Step VRops 8.5-Part1

In first DataCenter we want to intstall and configure vRops 8.5 in large mode, Analytics nodes, witness nodes, and remote collectors have various hardware requirements for virtual machines and physical machines. You can find more information about the components to install on each server profile in your deployment, and the required hardware specifications, see the KB article vRealize Operations Manager Sizing Guidelines (KB 2093783).

1- Select an OVF template

2- Select a name and folder

3- Select a compute resource

4- Review details

5- Accept license agreements

6- According the our senario, I select Large deployment

7- Select storage

8- Select networks

9-  Customize template [ Your Gateway, Domain Name, Domain Search Path, Domain Name Servers, Network IP Address and Network Netmask]

10- Ready to complete 🙂